So before I married a window fitter, I like most people didn't think much about the installation process, and assumed all window installation methods would be much the same, regardless of which company/installer you choose. Well now I know better. The difficult bit is explaining to other people how they are different, and why it makes a difference. So here goes, and if after reading you have any further questions about the installation method or anything else, please call us for a chat on 01823 245100.
So what is different?
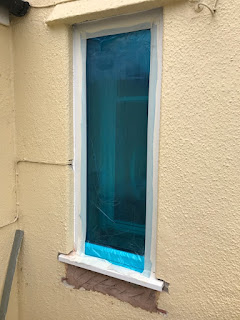
Below shows the before, during and after photos of a relatively small window. You'll notice that in the before photo the window is set back within the wall (it's within a stone building, so the walls are particularly thick), and their are tiles lining the external sill.
Now when employing most companies, you would get a like for like installation. This is for a couple of reasons. Firstly it is easier and quicker to survey. You don't really have to do much extra thinking, just take the existing measurements. Secondly it is much easier and quicker to install. Lastly the internal and external reveals (the sides and top of the window) will be easier to finish. All these savings mean they can fit many more windows / doors in a day.
 |
| Before |
 |
| After installation, waiting for rendering |
 |
| Rendered and waiting for painting |
But we at Fenestra, don't think they are good enough reasons. We take pride in our work, and want our window and door installations to be, and look the best they possibly can. That is why we put in the extra thought, and the extra effort into all of our work. When you compare the first to the last photo, you can see that Matthew has brought the window forward substantially. This has given the homeowners a beautifully large internal window sill, and removed the dated tiles.
Now on first inspection you might think this is the only difference, but their are some other points you probably haven't noticed, and these are what really set us apart.
Silicone
Our main aim it to hide unsightly silicone. If you look at the majority of PVCu windows, you will see a plethora of silicone. It's ugly and unnecessary. Unfortunately, it's commonly used in excess by installers who are trying to make labour savings and mean that some lovely windows end up looking cheap.
|
Silicone is an essential double glazing fixing agent, as it is flexible and watertight. But it is not an attractive finish. Where as most companies are happy to either finish the installation service here (or use a lot of heavy trim), we hide the silicone using a variety of skilled finishing methods.
Internally we endeavor to fit directly to the plaster line. This is achieved via superior surveying methods and internal plastering to the reveals, and avoidance of heavy trims. It ensures a clean, sharp installation with excellent insulation.
Externally it is dependent on the finish. We will either re-render to the same finish as the existing render (as seen in the picture above), or add a thin decorative trim to brickwork.
Window Sills
Often another point to notice from a good quality installation are the horns on the window ledge. Shown in the first picture, but all too often these are removed as another labour saving exercise. We take the time to insert the window ledges directly into the wall. We never cut the window sill to fit and silicone it to the wall (which may crack due to movement) or even worse cut and remove them completely and have them straight inline with the window (shown below).
 |
| Fenestra's quality finishing: Fully rendered with window sill horns. |
| Compared to the all too common sight of straight cut sills and excessive silicone use. |
And finally we also offer a painting service, please enquire for additional charges for painting.
Our installations are second to none. We are confident that even our most economical products look superior simply because of our installation standards.
Call Fenestra today 01823 254100 to book your free, no obligation consultation.
|

Comments
Post a Comment